 By Dan Parkes (Director)
Recording and mastering 5.1 surround sound has until recently been the domain of big budget studios. However many relatively inexpensive audio software packages allow for multi-channel mixing and there was for many years a frustrating gulf between the ability to mix 5.1 and the inability to master a DVD with it. For Ambleton Delight we made the decision to experiment with 5.1 surround using a combination of software.
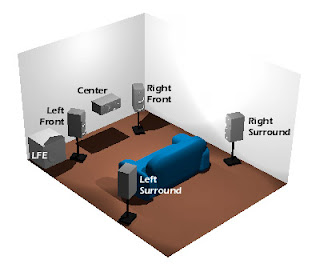
Firstly, lets define what 5.1 surround sound is. Technically it is actually six channels; the .1 refers to the low frequency bass channel. It normally comprises of six actual speakers: a front left and right, a center channel, two surround (rear) speakers plus a sub woofer (bass, or LFE). While there is the possibility of recording 5.1 on location for us it was all done in post, using Adobe Audition 3.
 Our workflow:
- All of the audio in the film was divided into 5 main tracks: dialogue, foley, atmospheric sound effects, atmospheric music and score.
- In Adobe Audition 3 each of these tracks was then pointed to various speakers using its surround sound panner. For example the dialogue track (mono) was pointed to the centre speaker channel only. Foley effects were pointed to the front left and right. Atmospheric sound effects and music were spread around all of the speakers
- Surround sound "moments": There are one or two moments in the film when sound was actually pointed to the rear speakers -for example when someone shouts off screen. These should be used sparingly as they can draw extra attention to themselves.
- Score reverb. For the score of the film to be in 5.1 we created a "bus" so that a separate track was created containing just the reverb of the score which we then pointed to the rear speakers.
- Once the 5 main tracks of the film had been organised into which speaker they would be pointed, we then exported from Audition 3 six uncompressed mono 48K WAV files, each WAV file being for each speaker.
- We then imported these six WAV files into a freeware piece of software called "WAV to AC3 Encoder" which as its name suggests combined the six WAV files into one AC3 file.
- We then imported the AC3 file into Adobe Encore DVD authoring software as an "asset" and then added an extra audio track to the film's timeline (track 2 -it is best to have track 1 as the stereo track as this will be the default audio) and put the AC3 file onto the track -making sure it matched the length of the video.
- We created a menu option on the DVD to select the 5.1 track.


Great advice guys. Of course as you say this is faking 5.1 really (ideal for those projects with no budget!)
ReplyDeleteFor the real deal if you want proper 3d immersive 5.1 surround mixes doing for your films we can probably help! - www.21stcenturygenius.com and e us about your project
Cheers
Sarah
21stCenturyGenius Audio