Wednesday 29 September 2010

Tip #48: Try 'Guerilla' filming (if appropriate)

By Dan Parkes (Director)

The style of 'guerilla filmmaking' does not suit every project. Few would have thought it would suit a gentle relationship-heavy drama about English village politics...!

Technically, as definied in Wikipedia, it means independent low budget film making using "skeleton crews, and simple props ... shot quickly in real locations without any warning, and without obtaining permission from the owners of the locations." It is usually because filmmakers "don't have the budget to get permits, rent out locations, or build expansive sets." This often means handheld 'gritty' shots with no artificial lighting, make-up or large cinematic cameras that would draw obvious attention.

Anecdote: Wikipedia states that this style is not used by studios as they could be sued or fined. But I know from personal experience this is not always the case. I worked for an overseas studio who because clearance for a particular shot in a UK railway station was astronomically expensive, successfully filmed it guerrilla style by wandering in with a large cinematic camera in hand looking like they were about to catch a train. No one noticed until they had got 3 takes done, were questioned briefly but left with staff none the wiser that they had filmed what they wanted. I am definitely not recommending this course... but would recommend certain locations made themselves more helpful when it comes to doing some simple non-instrusive filming and are willing to pay for it.

For us, guerilla filmmaking was perfect for our black and white flashback scenes which details the main character's backstory in which he gets involved in a gang and drug culture that dramatically affects his future reputation and perception of life. Crew only consisted of myself with a shoulder mounted camera (without the 35mm lenses) and I worked with the two actors, Dan Smith and Pete Allen filming almost whereever we felt like it: running down a main street, through parks, down alleyways, even beating up a Chinese actor with an ever-increasing audience watching us. We were never once stopped!


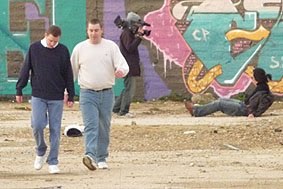
A very simple tip is to be very well prepared. We spent a lot more time rehearsing the scenes than we ever did filming them. An interesting device we used is that the camera was actually the main character's point of view (POV) so we spent time practicising how to interact with the camera as you would a person, talking to them, passing them items, being carried around (such as during the overdose sequence). It meant as a director I became part of the action -in fact one of the actors- so was a fully immersive and at times quite frightening experience.

Wednesday 22 September 2010

Tip #47: The art of filming rain

By Dan Parkes (Director)

For some reason there is nothing like a good rain scene in a film! It often serves as a dramatic juncture in a character or plot development. One may think you only need to wait a few days before it rains in England... however a little known fact is that natural rain does not show up well on film, other than making surfaces appear wet. Which of course can be a good thing if there is light rain when you don't want it -although it depends on the shot, chances are you may be about to get away with it. But what if you want rain? How did we film our dramatic rain scene on such a low budget?

To start with we made a make-shift 'rain machine' which simply consisted of a garden sprinkler on the end of a long pole. The water becomes more realistic the higher above the actor or area it is, giving it enough distance to fall evenly. Obviously a proper rain machine would have been better...however this was easily accessible and even better... free!

Our boom operator/sound recordist Colin Bradley became our 'rain operator' which also made sense, since were unable to record live sound anyway due to the sound of the sprinkler water -which because of the hose and large droplets did not sound like realistic rain. So in post we added the sound effects of real rain and recorded the actor's lines separately (ADR).

The next and most cricual factor is that rain will not show on screen sufficiently unless it is back-lit. We placed a large 2K light behind the actor just off screen and found it was enough to light the rain.


Of course, having large lights around with falling water is a health and safety nightmare and a recipe for disaster, not to mention ensuring you have towels and a change of clothes for the actors. In our case we have the added danger element of filming in January when it was near enough snowing let alone raining, with ice forming in the puddles we were creating and sometimes blocking the hose pipe, then our young actor realising that his actor parents were 'splitting' in the scene and getting upset, plus a growing audience of local youth intent on interrupting the shot.... so in fact the simple trick of back lighting rain pailed into insignificance!

Thursday 16 September 2010

Tip #46: Actor's own wardrobe where possible

By Dan Parkes and Itsuka Yamasaki

There is no underestimating the importance wardrobe can have on a production, as clothes can speak volumes about a person, their personality, particular mood or character arc. But it can also be very costly if you have every member of cast being measured and fitted out in their own particular costume which may change several times during the course of the film.

Our answer was to provide wardrobe only when the actors were unable. For example, our main character John is a restaurant chef, so we purchased appropriate wardrobe including a chef's top and apron. Also, in the flashback scenes, the characters of Wayne and Andy required specific 1980s footwear and jeans, which we bought for the actors (photograph above left). Ben Rohde, who was advising us on the accuracy of the flashback scenes, also delved into his own wardrobe and found appropriate clothing from what he remembered from his experiences.

Above: Actor Brian Capron discusses his wardrobe
with production designer/producer
Sinead Ferguson and director Dan Parkes

In the case of the rest of the cast they were dressed in clothes that were readily available to them. Before rehearsals we asked them to bring along a selection of clothes they thought would be suitable for the character with some suggestions if necessary. Then at the rehearsal we would ask them to try on different clothes and take photographs and make decisions on what we think worked best, thinking about the characters state of mind and general production design issues (such as clashes with the background).

Above: Actor Andrew Elias posing in his
wardrobe during rehearsals.

In most cases we could make decisions at the rehearsal of what will work and make notes regarding this and then include a 'must-bring' on the actor's call sheet. But also some decisions were made during filming and this emphasised the need to photograph the actor in what they were wearing so as to ensure continuity matches throughout the film.

Wednesday 8 September 2010

Tip #45: Ensure good on-set sound

By Dan Parkes (Director)

One of the first victims of low-budget film production is unfortunately often the sound. Even higher end productions can have sound issues, so it is no wonder that when the budget is low or non-existant that the sound suffers first. However, when good visuals are marred by poor or unprofessional sound the result can be very detrimental to the entire project. And since good sound is not rocket science or hugely expensive, there should be no need for it to ever suffer.

On Ambleton Delight we had a very simple set up that in the end was very effective -in fact many have commented on how good the sound is. Firstly we had a great sound man, Colin Bradley, with a good ear for sound. Technically we used a Sennheiser ME-66 shot gun microphone with a K6 power supply, a Rycote Softie with pistol grip/suspension and a Lightwave G5 carbon fibre boom pole. This is not particularly expensive kit and is affordable whether purchased or hired.

Above: Sound recordist Colin Bradley
boom operating on location.

Ideally it is better to record the sound into a DAT or some other kind of separate audio recorder, and use a clapperboard and then sync later in post (this is especially true with the present sound limitations of DSLRS). However we ended up recording the sound direct to camera via an XLR lead. While not ideal this has the benefit of having the sound already synced for post. The negative was that our sound recordist had to monitor the sound via the camera which meant he was not free to move far from the camera's position.

Some key points to remember:
  1. Use separate microphones. Do not ever use the stock camera microphone as it is almost always poor quality and picks up camera noise.
  2. Use directional mics. Shot gun mics or lapel/radio mics are best, depending on the environment and acoustics.
  3. Be sound conscious. Bad sound equals bad film. When planning a shoot think about possible sound interefence issues.
  4. Have sound monitered by someone with a good ear, using headphones. You might not notice that plane flying overhead, but a good recordist will. They will also know how best to use the microphones and what levels are good.
  5. Record room tones and extra bacground sound whenever possible. For example, we recorded people talking and clapping in the village hall for later reference and proved invaluable.
  6. Don't ever say 'fix it in post'! While good sound post-production is a must, try to get the best you can on the shoot as ADR and other post fix-it measures are not always satisfactory.
Above: Getting good sound can sometimes
mean some akward situations.
Here sound recordist
Colin Bradley
sits on the roof!